강좌 전체보기
.
이번 파트에서는 안드로이드 폰 2대를 블루투스를 이용해 연결하는 방법입니다. 별다른 외부 통신 모듈이 필요치 않고 phone to phone 직접 연결이 가능하다는 장점이 있어 유용한 경우가 있을겁니다.
안드로이드 블루투스 연결 테스트
블루투스 연결을 위해 안드로이드 폰 하나를 Master 로 만들고 다른 폰 하나는 Slave 로 동작하도록 만들어야 합니다. 각각의 역할은 아래와 같습니다.
- Master
- 일반적으로 센서 장치를 스캔해서 연결할 때의 안드로이드가 Master 역할입니다.
- [스캔 -> 페어링 -> PIN 코드 입력 -> 데이터 전송] 순서로 동작합니다.
- Bluetooth Socket 을 생성해서 연결을 시도합니다.
- Slave
- 센서 장치의 역할을 합니다.
- 외부에서 자신을 스캔할 수 있도록 discoverable 상태로 만들어줘야 합니다.
- discoverable 상태는 300 초 간 유지할 수 있습니다.
- Bluetooth Server Socket 을 생성하고 외부에서의 연결을 기다립니다.
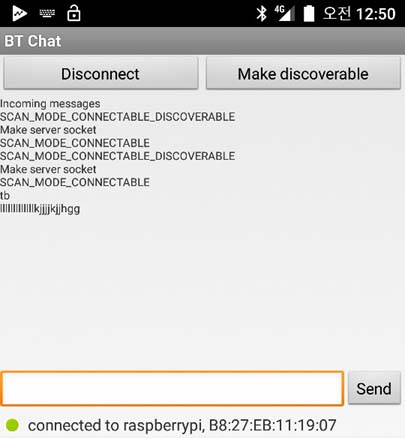
테스트는 간단합니다. 2 대의 안드로이드 폰을 준비하고 앞선 예제에 사용했던 BtChat 앱을 양쪽에 깔아줍니다.
앱을 실행하면 상단에 2개의 버튼이 있습니다. Slave 로 동작할 폰은 [Make discoverable] 을 클릭합니다. 그리고 Master로 동작할 폰에서 [Scan for devices] 버튼을 눌러 다른 폰을 스캔하면 됩니다.

연결할 폰의 이름이 보이면 페어링 후 접속하면 됩니다. 그럼 두 폰이 서로 채팅을 할 수 있습니다.
테스트 자체는 간단합니다. 이제 여기에 사용된 안드로이드 소스코드를 확인해보도록 하겠습니다.
안드로이드 블루투스 코드 분석
테스트에 사용된 BtChat 앱 소스에는 안드로이드에서 클래식 블루투스 사용을 위해 필요한 코드가 모두 들어있습니다. 아래 링크에 안드로이드 Kotlin, Java 소스들이 들어있습니다.
주요한 파일들은 아래와 같습니다.
- SplashActivity.kt
- 앱을 실행했을 때 진입하는 첫 화면입니다. 첫 실행인 경우 사용자가 ACCESS_FINE_LOCATION / ACCESS_COARSE_LOCATION 권한을 승인하도록 요청합니다. 이 권한은 주변의 블루투스 장치를 scan 하기 위한 필수 권한으로 사용자 동의를 얻어야 합니다. 권한이 이미 승인된 상태라면 바로 MainActivity 로 이동합니다.
- MainActivity.kt
- 채팅 UI 가 표시되는 메인 화면입니다. 상단의 버튼 두 개를 통해 안드로이드 폰을 Master / Slave 로 동작시킬 수 있습니다. Master 로 동작하기 위해 [Scan for devices] 버튼을 누르면 DeviceListActivity 화면을 팝업으로 띄웁니다. DeviceListActivity 화면에서 특정 블루투스 기기를 선택하고 PIN 코드 입력 완료되면 채팅창을 통해 메시지를 주고받을 수 있습니다.
- [Make discoverable] 버튼을 누르면 사용자 승인 후 외부 장치에서 이 폰을 scan 할 수 있습니다. 이 때 폰은 Server socket 을 열고 연결을 기다립니다.
- DeviceListActivity.kt
- 주변에 있는 클래식 블루투스 장치를 스캔하고 결과를 리스트로 알려주는 팝업 화면입니다. 특정 장치를 선택하면 연결을 시도할 수 있습니다.
- bluetooth / BluetoothManager.kt
- 실제 블루투스를 제어하기 위한 핵심 코드들 입니다. 블루투스 동작에 관련된 코드가 모두 여기에 있으므로 이 파일 위주로 분석해야 합니다.
메인 화면에서 [Scan for devices] 버튼을 누르면 DeviceListActivity 화면이 팝업으로 뜹니다.
여기서 스캔을 실행한 경우 BluetoothManager의 코드 호출 순서는 아래와 같습니다.
    fun startDiscovery() {
        mAdapter.startDiscovery()
    }
mAdapter 는 안드로이드에서 제공하는 BluetoothAdapter 입니다. startDiscovery() 함수를 호출해 스캔을 시작합니다. 스캔 결과는 Broadcast 를 통해 전달됩니다.
그래서 DeviceListActivity 에서 해당 Broadcast 를 수신할 수 있는 Receiver 를 등록해 두었습니다.
    // The BroadcastReceiver that listens for discovered devices and
    // changes the title when discovery is finished
    private val mReceiver = object : BroadcastReceiver() {
        override fun onReceive(context: Context, intent: Intent) {
            val action = intent.action

            // When discovery finds a device
            if (BluetoothDevice.ACTION_FOUND == action) {
                // Get the BluetoothDevice object from the Intent
                val device = intent.getParcelableExtra<BluetoothDevice>(BluetoothDevice.EXTRA_DEVICE)
                // If it's already paired, skip it, because it's been listed already
                if (device.bondState != BluetoothDevice.BOND_BONDED) {
                    for(cached_device in mDeviceList) {
                        if(cached_device.address.equals(device.address))
                            return
                    }
                    Logs.d("# Device found... ${device.name}, ${device.address}, state=${device.bondState}")
                    mNewDevicesArrayAdapter.add(device.name + "\n" + device.address)
                }
                // When discovery is finished, change the Activity title
            } else if (BluetoothAdapter.ACTION_DISCOVERY_FINISHED == action) {
                setProgressBarIndeterminateVisibility(false)
                setTitle(R.string.select_device)
                if (mNewDevicesArrayAdapter.count == 0) {
                    val noDevices = resources.getText(R.string.none_found).toString()
                    mNewDevicesArrayAdapter.add(noDevices)
                }
                showScanButton(true)
            }
        }
    }
장치가 발견되면 리스트에 장치를 추가해서 표시합니다.
리스트에서 장치를 선택하면 해당 장치에 대한 정보를 MainActivity 로 전달해줍니다.
    // The on-click listener for all devices in the ListViews
    private val mDeviceClickListener = AdapterView.OnItemClickListener { av, v, arg2, arg3 ->
        // Cancel discovery because it's costly and we're about to connect
        mBluetoothManager.cancelDiscovery()

        // Get the device MAC address, which is the last 17 chars in the View
        val info = (v as TextView).text.toString()
        if (info.length > 16) {
            val address = info.substring(info.length - 17)
            Log.d(TAG, "User selected device : $address")

            // Create the result Intent and include the MAC address
            val intent = Intent()
            intent.putExtra(EXTRA_DEVICE_ADDRESS, address)

            // Set result and finish this Activity
            setResult(Activity.RESULT_OK, intent)
            finish()
        }
    }
MainActivity 에서 선택된 블루투스 장치 정보를 받아 연결을 시도합니다.
    public override fun onActivityResult(requestCode: Int, resultCode: Int, data: Intent?) {
        Logs.d(TAG, "onActivityResult $resultCode")

        when (requestCode) {
            Const.REQUEST_CONNECT_DEVICE -> {
                // When DeviceListActivity returns with a device to connect
                if (resultCode == Activity.RESULT_OK) {
                    // Get the device MAC address
                    val address = data?.extras?.getString(DeviceListActivity.EXTRA_DEVICE_ADDRESS)
                    // Attempt to connect to the device
                    mBluetoothManager.connect(address)
                }
            }
            ......
        }    // End of switch(requestCode)
    }
BluetoothManager 에 있는 connect() 함수를 호출합니다. 이때 장치의 MAC address 정보를 함께 넘겨줍니다.
    fun connect(device: BluetoothDevice?) {
        Log.d(TAG, "Connecting to: $device")
        device ?: return

        if (state == STATE_CONNECTED)
            return

        // Cancel any thread attempting to make a connection
        if (state == STATE_CONNECTING) {
            if (mConnectThread != null) {
                mConnectThread!!.cancel()
                mConnectThread = null
            }
        }

        // Cancel any thread currently running a connection
        if (mConnectedThread != null) {
            mConnectedThread!!.cancel()
            mConnectedThread = null
        }

        // Start the thread to connect with the given device
        mConnectThread = ConnectThread(device)
        mConnectThread?.start()
        state = STATE_CONNECTING
    }
ConnectThread 를 생성해서 동작시킵니다. ConnectThread 코드는 아래와 같습니다.
    /**
     * This thread runs while attempting to make an outgoing connection
     * with a device. It runs straight through; the connection either
     * succeeds or fails.
     */
    private inner class ConnectThread(private val mmDevice: BluetoothDevice) : Thread() {
        private val mmSocket: BluetoothSocket?

        init {
            var tmp: BluetoothSocket? = null

            // Get a BluetoothSocket for a connection with the
            // given BluetoothDevice
            try {
                tmp = mmDevice.createRfcommSocketToServiceRecord(MY_UUID)
            } catch (e: IOException) {
                Log.e(TAG, "create() failed", e)
            }

            mmSocket = tmp
        }

        override fun run() {
            Log.i(TAG, "BEGIN mConnectThread")
            name = "ConnectThread"

            // Always cancel discovery because it will slow down a connection
            mAdapter.cancelDiscovery()

            // Make a connection to the BluetoothSocket
            try {
                // This is a blocking call and will only return on a
                // successful connection or an exception
                mmSocket!!.connect()
            } catch (e: IOException) {
                connectionFailed()
                // Close the socket
                try {
                    mmSocket!!.close()
                } catch (e2: IOException) {
                    Log.e(TAG, "unable to close() socket during connection failure", e2)
                }

                // Start the service over to restart listening mode
                this@BluetoothManager.start()
                return
            }

            // Reset the ConnectThread because we're done
            synchronized(this@BluetoothManager) {
                mConnectThread = null
            }

            // Start the connected thread
            connected(mmSocket, mmDevice)
        }

        fun cancel() {
            try {
                mmSocket!!.close()
            } catch (e: IOException) {
                Log.e(TAG, "close() of connect socket failed", e)
            }

        }
    }    // End of class ConnectThread
코드가 장황하지만 중요한 내용은 createRfcommSocketToServiceRecord() 함수를 호출해서 해당 블루투스 장치와 연결하기 위한 RFcomm 소켓을 생성하고 연결을 시도합니다. 해당 블루투스 장치의 ServerSocket 과 연결이 완료되면 지금 실행중인 ConnectThread 는 종료하고 ConnectedThread()를 생성하기 위해 connected() 함수를 호출합니다.
    /**
     * This thread runs during a connection with a remote device.
     * It handles all incoming and outgoing transmissions.
     */
    private inner class ConnectedThread(private val mmSocket: BluetoothSocket) : Thread() {
        private val mmInStream: InputStream?
        private val mmOutStream: OutputStream?

        init {
            Log.d(TAG, "create ConnectedThread")
            var tmpIn: InputStream? = null
            var tmpOut: OutputStream? = null

            // Get the BluetoothSocket input and output streams
            try {
                tmpIn = mmSocket.inputStream
                tmpOut = mmSocket.outputStream
            } catch (e: IOException) {
                Log.e(TAG, "temp sockets not created", e)
            }

            mmInStream = tmpIn
            mmOutStream = tmpOut
        }

        override fun run() {
            Log.i(TAG, "BEGIN mConnectedThread")
            var bytes: Int

            // Keep listening to the InputStream while connected
            while (true) {
                try {
                    // Read from the InputStream
                    val buffer = ByteArray(128)
                    Arrays.fill(buffer, 0x00.toByte())
                    bytes = mmInStream!!.read(buffer)

                    // Send the obtained bytes to the main thread
                    mHandler?.obtainMessage(MESSAGE_READ, bytes, -1, buffer)?.sendToTarget()
                } catch (e: IOException) {
                    Log.e(TAG, "disconnected", e)
                    connectionLost()
                    break
                }

            }
        }

        /**
         * Write to the connected OutStream.
         * @param buffer  The bytes to write
         */
        fun write(buffer: ByteArray) {
            try {
                mmOutStream!!.write(buffer)

                // Disabled: Share the sent message back to the main thread
                // mHandler.obtainMessage(Constants.MESSAGE_WRITE, -1, -1, buffer)
                //        .sendToTarget();
            } catch (e: IOException) {
                Log.e(TAG, "Exception during write")
            }

        }

        fun cancel() {
            try {
                mmSocket.close()
            } catch (e: IOException) {
                Log.e(TAG, "close() of connect socket failed")
            }

        }

    }    // End of class ConnectedThread
ConnectedThread 는 두 블루투스 장치가 연결되어 있는 동안은 계속 실행되는 thread 입니다. 소켓 연결이 완료되었으므로 input stream, output stream 을 생성하고 이를 통해 메시지를 보내거나 읽는 과정을 반복합니다. 메시지를 보낼 때는 ConnectedThread.write() 함수만 호출하면 됩니다. ConnectedThread 의 메인 루프인 run() 함수는 input stream 에서 블루투스 수신 데이터가 있는지 계속 체크해서 데이터를 가져와 UI로 보내주는 역할을 합니다.
ConnectedThread 가 실행되면 두 장치는 블루투스 통신할 준비가 완료된 것입니다.
메인 화면에서 [Make discoverable] 버튼을 누르면, 앞선 과정과는 반대로 외부 블루투스 장치가 이 장치를 스캔할 수 있도록 advertising packet 을 broadcast 합니다.
이때 호출되는 MainActivity 의 코드는 아래와 같습니다.
    private fun ensureDiscoverable() {
        if (mBluetoothManager.getScanMode() != BluetoothAdapter.SCAN_MODE_CONNECTABLE_DISCOVERABLE) {
            val intent = Intent(BluetoothAdapter.ACTION_REQUEST_DISCOVERABLE)
            intent.putExtra(BluetoothAdapter.EXTRA_DISCOVERABLE_DURATION, 30)
            startActivityForResult(intent, Const.REQUEST_DISCOVERABLE)
            ......
        } else {
            ......
        }
    }
안드로이드 framework 에 discoverable 요청을 보냅니다. 그러면 안드로이드 framework 에서 scan 모드를 SCAN_MODE_CONNECTABLE_DISCOVERABLE 로 변경합니다.
스캔 모드가 변경된 결과를 BroadcastReceiver 로 받아서 연결 요청이 왔을 때 처리할 수 있도록 작업을 해줘야 합니다.
    private val mReceiver = object : BroadcastReceiver() {
        override fun onReceive(context: Context, intent: Intent) {
            val action = intent.action

            // When discovery finds a device
            if (BluetoothAdapter.ACTION_SCAN_MODE_CHANGED == action) {
                val scanMode = intent.getIntExtra(BluetoothAdapter.EXTRA_SCAN_MODE, -1)
                val prevMode = intent.getIntExtra(BluetoothAdapter.EXTRA_PREVIOUS_SCAN_MODE, -1)
                when(scanMode) {
                    BluetoothAdapter.SCAN_MODE_CONNECTABLE_DISCOVERABLE -> {
                        btn_scan.isEnabled = false
                        btn_discover.isEnabled = false
                        text_chat.append("\nSCAN_MODE_CONNECTABLE_DISCOVERABLE")
                        text_chat.append("\nMake server socket")

                        mBluetoothManager.start()
                    }
                    BluetoothAdapter.SCAN_MODE_CONNECTABLE -> {
                        btn_scan.isEnabled = true
                        btn_discover.isEnabled = true
                        text_chat.append("\nSCAN_MODE_CONNECTABLE")
                    }
                    BluetoothAdapter.SCAN_MODE_NONE -> {
                        // Bluetooth is not enabled
                        btn_scan.isEnabled = false
                        btn_discover.isEnabled = false
                        text_chat.append("\nBluetooth is not enabled!!")
                    }
                }
            }
        }
    }
Scan 모드가 SCAN_MODE_CONNECTABLE_DISCOVERABLE 로 변경되면 BluetoothManager.start() 함수를 호출해 줬습니다.
    /**
     * Start the chat service. Specifically start AcceptThread to begin a
     * session in listening (server) mode. Called by the Activity onResume()  */
    @Synchronized
    fun start() {
        Log.d(TAG, "Starting BluetoothManager...")

        // Cancel any thread attempting to make a connection
        if (mConnectThread != null) {
            mConnectThread!!.cancel()
            mConnectThread = null
        }

        // Cancel any thread currently running a connection
        if (mConnectedThread != null) {
            mConnectedThread!!.cancel()
            mConnectedThread = null
        }

        // Start the thread to listen on a BluetoothServerSocket
        if (mAcceptThread == null) {
            mAcceptThread = AcceptThread()
            mAcceptThread?.start()
        }
        state = STATE_LISTEN
        mIsServiceStopped = false
    }
기존에 실행중인 ConnectThread, ConnectedThread 가 있으면 모두 닫고 AcceptThread 를 실행해줍니다.
    /**
     * This thread runs while listening for incoming connections. It behaves
     * like a server-side client. It runs until a connection is accepted
     * (or until cancelled).
     */
    private inner class AcceptThread : Thread() {
        // The local server socket
        private val mmServerSocket: BluetoothServerSocket?

        init {
            var tmp: BluetoothServerSocket? = null

            // Create a new listening server socket
            try {
                tmp = mAdapter.listenUsingRfcommWithServiceRecord(NAME, MY_UUID)
            } catch (e: IOException) {
                Log.e(TAG, "listen() failed" + e.toString())
            }

            mmServerSocket = tmp
        }

        override fun run() {
            Log.d(TAG, "BEGIN mAcceptThread" + this)
            var socket: BluetoothSocket? = null

            // Listen to the server socket if we're not connected
            while (this@BluetoothManager.state != STATE_CONNECTED) {
                try {
                    // This is a blocking call and will only return on a
                    // successful connection or an exception
                    if (mmServerSocket != null) {
                        this@BluetoothManager.state = STATE_CONNECTING
                        socket = mmServerSocket.accept()
                    }
                } catch (e: IOException) {
                    this@BluetoothManager.state = STATE_NONE
                    Log.e(TAG, "accept() failed", e)
                    break
                }

                // If a connection was accepted
                if (socket != null) {
                    when (this@BluetoothManager.state) {
                        STATE_LISTEN, STATE_CONNECTING ->
                            // Situation normal. Start the connected thread.
                            connected(socket, socket!!.remoteDevice)
                        STATE_NONE, STATE_CONNECTED ->
                            // Either not ready or already connected. Terminate new socket.
                            try {
                                socket!!.close()
                            } catch (e: IOException) {
                                Log.e(TAG, "Could not close unwanted socket", e)
                            }

                        else -> {
                        }
                    }
                }
            }
            Log.i(TAG, "END mAcceptThread")
        }

        fun cancel() {
            Log.d(TAG, "cancel " + this)
            try {
                mmServerSocket?.close()
            } catch (e: IOException) {
                Log.e(TAG, "close() of server failed" + e.toString())
            }
            this@BluetoothManager.state = STATE_NONE
        }
    }    // End of class AcceptThread
AcceptThread 의 주요 역할은 ServerSocket을 생성하고 외부 블루투스 장치의 소켓 연결 요청이 올 때까지 대기합니다. 아래 코드가 바로 이 일을 하는 코드입니다.
- socket = mmServerSocket.accept()
연결이 완료되어 socket 을 리턴받으면, 이제 이 소켓을 ConnectedThread로 넘깁니다. ConnectedThread 는 앞서서 설명했듯 해당 소켓의 input, output stream 을 열과 데이터 전송과 수신을 계속 처리해주는 thread 입니다. 연결이 종료될 때 까지 ConnectedThread 는 유지됩니다.
활용
사실 안드로이드 폰을 서로 블루투스로 연결해야 할 상황은 많지 않습니다. 두 개의 폰을 서로 연결해서 파일 전송을 할 때 정도가 유용한 시나리오 일겁니다.
이번 예제에서 중요한 점은 안드로이드에서 블루투스 프로그래밍을 어떻게 하는지 익혀두는 것입니다. 안드로이드 Master/Slave 역할로 동작하는 코드를 작성해두면 추후 모바일 폰에서 블루투스를 사용하는 어떤 상황이든 대처가 가능해지니까요!!

참고
주의!!! [사물 인터넷 네트워크와 서비스 구축 강좌] 시리즈 관련 문서들은 무단으로 내용의 일부 또는 전체를 게시하여서는 안됩니다. 계속 내용이 업데이트 되는 문서이며, 문서에 인용된 자료의 경우 원작자의 라이센스 문제가 있을 수 있습니다.
.
.
강좌 전체보기
.

안녕하세요.
소켓연결까지 다 해서 원격 디바이스에서 예를 들어 ‘a’라는 글자를 보냈다고 하면
안드로이드에서 그 글자를 읽어 와서 메인 UI에 출력하게 하려고 하는데 그런데 이상하게 bytes에는 ‘a’가 아니라
그냥 아라비아 숫자 한자만 들어 있습니다. 6 이라고 표시 됩니다. bytes에 읽어 온 데이터를 후반 처리 해줘야 하나요?
원격 디바이스에서 긴 문장을 보냈을 경우 안드로이드 에서는 이것을 하나씩 읽어서 배열에 넣어서 변환해서 메인화면으로 보내야 하나요?