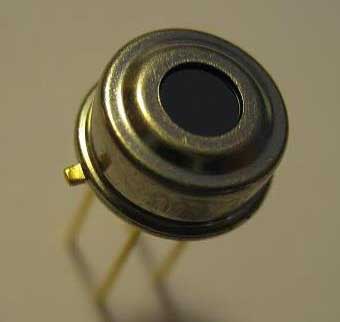
MLX90614
저렴한 온도센서는 널렸기 때문에 구하기 쉽습니다만, 비접촉식으로 동작하는 정밀한 온도센서는 얘기가 틀립니다. 보통 체온잴 때 병원에서 사용하는 온도센서 같은걸 말하는겁니다.
MLX90614 센서는 물체에서 방출되는 적외선을 통해 온도를 측정하는 센서입니다. 17비트 ADC와 DSP 유닛을 탑재해서 작은 사이즈임에도 높은 정확도와 해상력을 자랑합니다. -70 ~ 380’C 범위를 0.02’C 단위로 측정이 가능합니다. 상세한 스펙은 아래를 참고하세요.
- Small size, low cost
- Easy to integrate
- Factory calibrated in wide temperature range: -40 to 125 °C for sensor temperature and -70 to 380 °C for object temperature.
- High accuracy of 0.5°C over wide temperature range (0..+50 C for both Ta and To)
- Medical accuracy of 0.1°C in a limited temperature range available on request
- Measurement resolution of 0.01°C
- Single and dual zone versions
- SMBus compatible digital interface for fast temperature readings and building sensor networks
- Customizable PWM output for continuous reading
- Available in 3V and 5V versions
- Simple adaptation for 8 to 16V applications
- Power saving mode
- Different package options for applications and measurements versatility
- Automotive grade
연결 방법
Breakout 보드에 연결되지 않은채 센서 모듈만 가진 상황이라면 아래와 같이 연결할 수 있습니다.
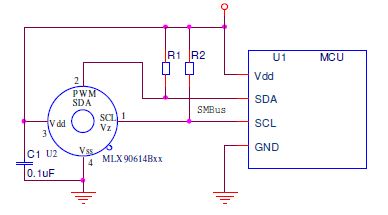
I2C 모듈을 연결하는 일반적인 방법인데 2개의 pull-up 저항이 사용되고 VCC, GND 사이에 커패시터가 사용되었습니다. [연결방법 상세 이미지]
아래와 같이 Breakout 에 연결된 모듈을 사면 보다 편리하게 사용할 수 있습니다.

이 경우는 SDA, SCL, VCC, GND 를 아두이노의 A4, A5, 3.3V, GND 핀에 연결해줍니다.
라이브러리
이 센서의 유일한 문제점은… I2C 통신을 지원하지만 Wire 라이브러리를 사용할 수 없다는 겁니다. 별도의 전용 라이브러리를 설치해서 사용해야 합니다. I2CMaster 라이브러리를 사용하는 방법과 Adafruit_MLX90614 라이브러리를 사용하는 방법이 있습니다. 여기서는 Adafruit 라이브러리를 이용해서 테스트 해보겠습니다.
먼저 Adafruit_MLX90614 라이브러리를 다운로드 받아서 설치합니다.
소스코드
라이브러리가 설치되면 아두이노 IDE를 실행하고 설치한 라이브러리에 포함된 예제파일을 불러옵니다. mlxtest.ino 파일입니다.
/***************************************************
  This is a library example for the MLX90614 Temp Sensor

  Designed specifically to work with the MLX90614 sensors in the
  adafruit shop
  ----> https://www.adafruit.com/products/1748
  ----> https://www.adafruit.com/products/1749

  These sensors use I2C to communicate, 2 pins are required to
  interface
  Adafruit invests time and resources providing this open source code,
  please support Adafruit and open-source hardware by purchasing
  products from Adafruit!

  Written by Limor Fried/Ladyada for Adafruit Industries.
  BSD license, all text above must be included in any redistribution
 ****************************************************/

#include <Wire.h>
#include <Adafruit_MLX90614.h>

Adafruit_MLX90614 mlx = Adafruit_MLX90614();

void setup() {
  Serial.begin(9600);

  Serial.println("Adafruit MLX90614 test");

  mlx.begin();
}

void loop() {
  Serial.print("Ambient = "); Serial.print(mlx.readAmbientTempC());
  Serial.print("*C\tObject = "); Serial.print(mlx.readObjectTempC()); Serial.println("*C");
  Serial.print("Ambient = "); Serial.print(mlx.readAmbientTempF());
  Serial.print("*F\tObject = "); Serial.print(mlx.readObjectTempF()); Serial.println("*F");

  Serial.println();
  delay(500);
}
라이브러리 include 하고 초기화 코드만 실행해주면, 이후로는 필요할 때 센서값을 읽기만하면 됩니다. 간단하죠.
아래는 센서 모듈과 OLED 디스플레이를 이용해 체온을 측정해서 보여주도록 작성한 예제입니다.
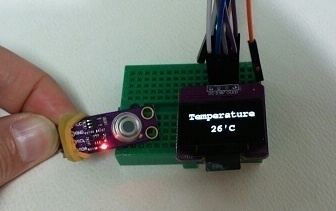
코드는 아래와 같습니다. 온도센서 예제에 u8glib를 이용해서 OLED 디스플레이 하도록 코드를 추가했습니다.
/***************************************************
  This is a library example for the MLX90614 Temp Sensor

  Designed specifically to work with the MLX90614 sensors in the
  adafruit shop
  ----> https://www.adafruit.com/products/1748
  ----> https://www.adafruit.com/products/1749

  These sensors use I2C to communicate, 2 pins are required to
  interface
  Adafruit invests time and resources providing this open source code,
  please support Adafruit and open-source hardware by purchasing
  products from Adafruit!

  Written by Limor Fried/Ladyada for Adafruit Industries.
  BSD license, all text above must be included in any redistribution
 ****************************************************/

#include <Wire.h>
#include <Adafruit_MLX90614.h>
#include "U8glib.h"

Adafruit_MLX90614 mlx = Adafruit_MLX90614();

///////////////////////////////////////////////////////////////////
//----- OLED instance
// IMPORTANT NOTE: The complete list of supported devices
// with all constructor calls is here: http://code.google.com/p/u8glib/wiki/device
U8GLIB_SSD1306_128X64 u8g(U8G_I2C_OPT_NONE|U8G_I2C_OPT_DEV_0);	// I2C / TWI
///////////////////////////////////////////////////////////////////

void setup() {
  Serial.begin(9600);
  Serial.println("Adafruit MLX90614 test");
  mlx.begin();
}

void loop() {
  Serial.print("Ambient = "); Serial.print(mlx.readAmbientTempC());
  Serial.print("*C\tObject = "); Serial.print(mlx.readObjectTempC()); Serial.println("*C");
  Serial.print("Ambient = "); Serial.print(mlx.readAmbientTempF());
  Serial.print("*F\tObject = "); Serial.print(mlx.readObjectTempF()); Serial.println("*F");
  Serial.println();

  String strTemp = String("");
  strTemp += (int)(mlx.readObjectTempC());
  char buff[10];
  strTemp.toCharArray(buff, 5);
  buff[2] = 0x27;
  buff[3] = 'C';
  buff[4] = 0x00;

  drawTemp(buff);

  delay(500);
}

void drawTemp(char* strTemp) {
  // picture loop
  u8g.firstPage();
  do {
    // show text
    u8g.setFont(u8g_font_courB14);
    u8g.setFontRefHeightExtendedText();
    u8g.setDefaultForegroundColor();
    u8g.setFontPosTop();
    u8g.drawStr(5, 12, "Temperature");
    u8g.drawStr(45, 40, strTemp);
  } while( u8g.nextPage() );
}
참고자료

초기화 이후 센서값을 읽는데 걸리는 시간은 얼마나 되나요? mlx90614 데이터시트를 보면 응답속도가 0.15초로 되어 있던데 이 응답속도가 온도값 요청후 응답이 오는데 걸리는 시간인가요? 응답속도가 아주 빠른 모듈을 찾고 있습니다.
말씀하신 부분은 저도 잘 모르겠습니다;; 그저 체감상 매우 응답이 빠르구나 정도였습니다.
이 센서는 최대 인식거리와 최소 인식거리는 얼미정도인가요??